OCAPI / SCAPI
Clients im Account Manager anlegen
Abschnitt betitelt „Clients im Account Manager anlegen“OCAPI-Clients müssen im Commerce Cloud Account Manager registriert werden, bevor du OAuth-Tokens nutzen kannst. So legst du einen Client an:
- Login & Navigation
- In Account Manager einloggen (account.demandware.com)
- Links
API Clientauswählen Add API Clientklicken
- Basisdaten (Name + Secret)
Display Namevergeben (sprechend, z. B. „SCAPI Admin – CI Pipeline“)Passwordsetzen + bestätigen (client secret)Secretsicher speichern (Passwortmanager)
- Organization zuordnen
- Abschnitt
Organizations→Add→ deine Org(s) auswählen →Addklicken
- Abschnitt
- Rollen zuweisen (für OCAPI und SCAPI unterschiedlich)
- SCAPI
- Abschnitt
Roles→Add - In der Kategorie
Salesforce Commerce APIdie RolleSalesforce Commerce APIauswählen →Add - Danach per Filter die Organization auswählen und die Instances hinzufügen, die der Client bedienen darf
- Abschnitt
- OCAPI
- keine Rolle zuweisen
- OCAPI-Berechtigung passiert später in
Business Manager
- SCAPI
- Token Endpoint Auth Method
client_secret_postauswählen
- Speichern
Saveklicken
OCAPI in Business Manager aktivieren
Abschnitt betitelt „OCAPI in Business Manager aktivieren“-
Business Manager öffnen
Melde dich imBusiness Managerdeiner Sandbox an. -
Open Commerce API Settings
Navigiere zuAdministration→Site Development→Open Commerce API Settings. -
API-Einstellungen pro Shop konfigurieren
- Wähle die gewünschte Site (z. B. RefArch oder deine Storefront-Site).
- Setze Enable OCAPI auf Enabled.
- Lege die erlaubten OCAPI-Versionen fest (z. B.
v22_10,v23_5je nach Bedarf). - Speichere die Änderungen.
-
Rollen und Berechtigungen Der im Account Manager angelegte OCAPI-Client nutzt die zugewiesenen API-Rollen. Stelle sicher, dass die Rolle z. B. Shop API – Read/Write (oder nur Read) für die gewünschten Ressourcen hat.
-
Token-URL und Basis-URL
- Token-URL (Auth):
https://<realm>.auth.<region>.commercecloud.salesforce.com/oauth/token - OCAPI-Basis-URL (Data):
https://<realm>-api.commercecloud.salesforce.com/site/<siteId>/Ersetze<realm>,<region>und<siteId>durch deine Werte (z. B. aus Account Manager / Business Manager).
- Token-URL (Auth):
Detaillierte Erklärung der JSON-Struktur:
Abschnitt betitelt „Detaillierte Erklärung der JSON-Struktur:“| Attribut | Bedeutung |
|---|---|
| _v | Für welche OCAPI Versionen gültig |
| client_id | Welcher API Client darf zugreifen |
| resource_id | Welche API Ressource erlaubt ist |
| methods | Welche HTTP Methoden erlaubt sind |
| read_attributes | Welche Felder gelesen werden dürfen |
| write_attributes | Welche Felder geschrieben werden dürfen |
Beispiel JSON-Struktur:
Abschnitt betitelt „Beispiel JSON-Struktur:“{ "_v": "26.2", "clients": [ { "client_id": "YOUR_CLIENT_ID_HERE", "resources": [ { "resource_id": "/product_search", "methods": ["get"], "read_attributes": "(**)" }, { "resource_id": "/products/*", "methods": ["get"], "read_attributes": "(**)" } ] } ]}{ "_v": "26.2", "clients": [ { "client_id": "aaaaaaaaaaaaaaaaaaaa", "resources": [ { "resource_id": "/sites", "methods": ["get"], "read_attributes": "(**)" } ] } ]}OCAPI Dokumentation:
Abschnitt betitelt „OCAPI Dokumentation:“Postman Collection für OCAPI
Abschnitt betitelt „Postman Collection für OCAPI“{ "name": "AdvancedAuth", "event": [ { "listen": "test", "script": { "exec": [ "pm.globals.unset(\"accessToken\");", "", "pm.test(\"Access Token successfully retrieved\", function() {", " pm.expect(pm.response.code).to.be.oneOf([200, 201, 202]);", "})", "", "var jsonData = pm.response.json();", "pm.collectionVariables.set(\"accessToken\", jsonData.access_token);" ], "type": "text/javascript" } } ], "protocolProfileBehavior": { "disabledSystemHeaders": {} }, "request": { "auth": { "type": "basic", "basic": [ { "key": "password", "value": "{{bm_password}}:{{pw}}", "type": "string" }, { "key": "username", "value": "{{bm_user}}", "type": "string" }, { "key": "showPassword", "value": false, "type": "boolean" } ] }, "method": "POST", "header": [ { "key": "Content-Type", "value": "application/x-www-form-urlencoded", "type": "text" }, { "key": "Host", "value": "{{client_url}}", "type": "text" } ], "body": { "mode": "urlencoded", "urlencoded": [ { "key": "grant_type", "value": "urn:demandware:params:oauth:grant-type:client-id:dwsid:dwsecuretoken", "type": "text" } ] }, "url": { "raw": "https://{{client_url}}/dw/oauth2/access_token?client_id={{client_id}}", "protocol": "https", "host": [ "{{client_url}}" ], "path": [ "dw", "oauth2", "access_token" ], "query": [ { "key": "client_id", "value": "{{client_id}}" } ] } }, "response": []}{ "name": "Product Search", "event": [ { "listen": "test", "script": { "exec": [ "pm.test(\"Search result retrieved\", function () {", " pm.expect(pm.response.code).to.be.oneOf([200, 201, 202]);", "});", "" ], "type": "text/javascript", "packages": {}, "requests": {} } } ], "protocolProfileBehavior": { "disabledSystemHeaders": { "user-agent": true, "host": true, "content-type": true, "accept": true, "connection": true } }, "request": { "auth": { "type": "bearer", "bearer": [ { "key": "token", "value": "{{accessToken}}", "type": "string" } ] }, "method": "GET", "header": [ { "key": "Host", "value": "{{client_url}}" }, { "key": "Content-Type", "value": "application/json" } ], "url": { "raw": "https://{{client_url}}/s/{{site_id}}/dw/shop/{{ocapi_version}}/product_search?client_id={{client_id}}&q=Travel", "protocol": "https", "host": [ "{{client_url}}" ], "path": [ "s", "{{site_id}}", "dw", "shop", "{{ocapi_version}}", "product_search" ], "query": [ { "key": "client_id", "value": "{{client_id}}" }, { "key": "q", "value": "Travel" } ] } }, "response": []},{ "info": { "_postman_id": "e85fbbf4-ea2a-4c36-9586-cec5469cabf0", "name": "OCAPI", "schema": "https://schema.getpostman.com/json/collection/v2.1.0/collection.json", "_exporter_id": "25001781" }, "item": [ ... ],}SCAPI: SLAS-Client anlegen
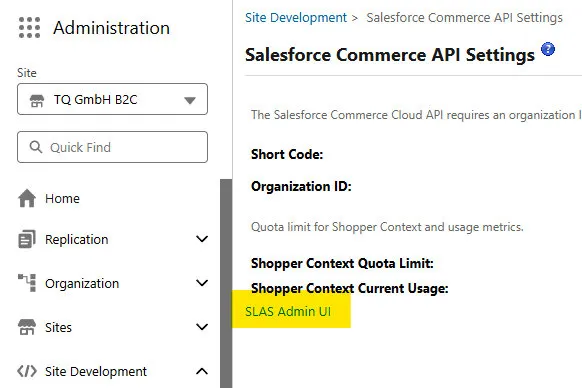
Abschnitt betitelt „SCAPI: SLAS-Client anlegen“-
Öffne das SLAS Admin UI deiner Organisation.
-
Lege einen neuen Client an und konfiguriere ihn wie folgt:
Feld Wert Client Name Frei wählbar, z. B. postman-devPrivate Client? ✅ aktiviert Scopes Relevante sfcc.shopper-*ScopesRedirect URI https://oauth.pstmn.io/v1/callbackChannels/Sites Site ID(s) aus Schritt 1, z. B. B2CLogin Restrict ❌ deaktiviert -
Speichere den Client. Das Secret wird automatisch generiert.
-
Notiere Client ID und Client Secret – du brauchst beides für Postman.
SCAPI Base URL and Request Formation
Abschnitt betitelt „SCAPI Base URL and Request Formation“https://{SHORT_CODE}.api.commercecloud.salesforce.com/{API_FAMILY}/{API_NAME}/v1/organizations/{ORGANIZATION_ID}/Beispielwerte
Abschnitt betitelt „Beispielwerte“| Platzhalter | Wert |
|---|---|
| {SHORT_CODE} | kv7kzm78 |
| {API_FAMILY} | product |
| {API_NAME} | shopper-products |
| {ORGANIZATION_ID} | f_ecom_zzte_053 |
Postman Collection für SCAPI
Abschnitt betitelt „Postman Collection für SCAPI“{ "name": "Auth SCAPI", "event": [ { "listen": "test", "script": { "exec": [ "pm.globals.unset(\"accessToken\");", "", "pm.test(\"Access Token successfully retrieved\", function() {", " pm.expect(pm.response.code).to.be.oneOf([200, 201, 202]);", "})", "", "var jsonData = pm.response.json();", "pm.collectionVariables.set(\"accessToken\", jsonData.access_token);" ], "type": "text/javascript", "packages": {}, "requests": {} } }, { "listen": "prerequest", "script": { "packages": {}, "type": "text/javascript" } } ], "request": { "auth": { "type": "basic", "basic": [ { "key": "password", "value": "{{clientSecretSCAPI}}", "type": "string" }, { "key": "username", "value": "{{clientIdSCAPI}}", "type": "string" } ] }, "method": "POST", "header": [ { "key": "Content-Type", "value": "application/x-www-form-urlencoded" } ], "body": { "mode": "urlencoded", "urlencoded": [ { "key": "grant_type", "value": "client_credentials", "type": "text" }, { "key": "channel_id", "value": "B2C", "type": "text", "uuid": "1c12a811-172f-4712-8683-a3b527a9564c" } ] }, "url": { "raw": "https://{{shortCode}}.api.commercecloud.salesforce.com/shopper/auth/v1/organizations/{{organizationId}}/oauth2/token", "protocol": "https", "host": [ "{{shortCode}}", "api", "commercecloud", "salesforce", "com" ], "path": [ "shopper", "auth", "v1", "organizations", "{{organizationId}}", "oauth2", "token" ] } }, "response": []}{ "name": "Shopper Search - Product Search", "request": { "auth": { "type": "bearer", "bearer": [ { "key": "token", "value": "{{accessToken}}", "type": "string" } ] }, "method": "GET", "header": [ { "key": "Authorization", "value": "Bearer {{accessToken}}" } ], "url": { "raw": "https://{{shortCode}}.api.commercecloud.salesforce.com/search/shopper-search/v1/organizations/{{organizationId}}/product-search?siteId={{site_id}}&q=travel", "protocol": "https", "host": [ "{{shortCode}}", "api", "commercecloud", "salesforce", "com" ], "path": [ "search", "shopper-search", "v1", "organizations", "{{organizationId}}", "product-search" ], "query": [ { "key": "siteId", "value": "{{site_id}}" }, { "key": "q", "value": "travel" } ] } }, "response": []}{ "info": { "_postman_id": "542f3eef-fde0-41ff-a6b9-b21c6c6765f3", "name": "SCAPI", "schema": "https://schema.getpostman.com/json/collection/v2.1.0/collection.json", "_exporter_id": "25001781" }, "item": [ ... ]}